Resolving Merge Conflicts
Sometimes changes made to code in different branches or by different people do not integrate well and cause what are called merge conflicts. Imagine you have a method that shows an error message. You made a change to that message to make it more clear, and your colleague did as well, but with slightly different wording. When you try to integrate those changes, Git cannot know which version to keep, and the repository will go into "Merge Conflict" mode.
This can happen in many scenarios:
- When merging a different branch into yours (whether your own or someone else's).
- When pulling changes from the remote while you have un-pushed local commits.
- When merging subtrees ... and others.
A repository is considered to be in Merge Conflict mode when one or more file shave a status code that contains U – such as UU, which means both the local copy and the remote that was brought in had (conflicting) changes to the file.
GitBrowser detects this mode and does several things:
- It shows a red "(conflicts)" tag in the repository tree, so you can see this status even when you are looking elsewhere in GitBrowser
- It highlights all conflicted files in red
- It shows a red "x unresolved conflicts" banner at the bottom of the Local Changes view.
- It disables any actions such as pull, fetch, commit, etc, until the conflict is resolved.
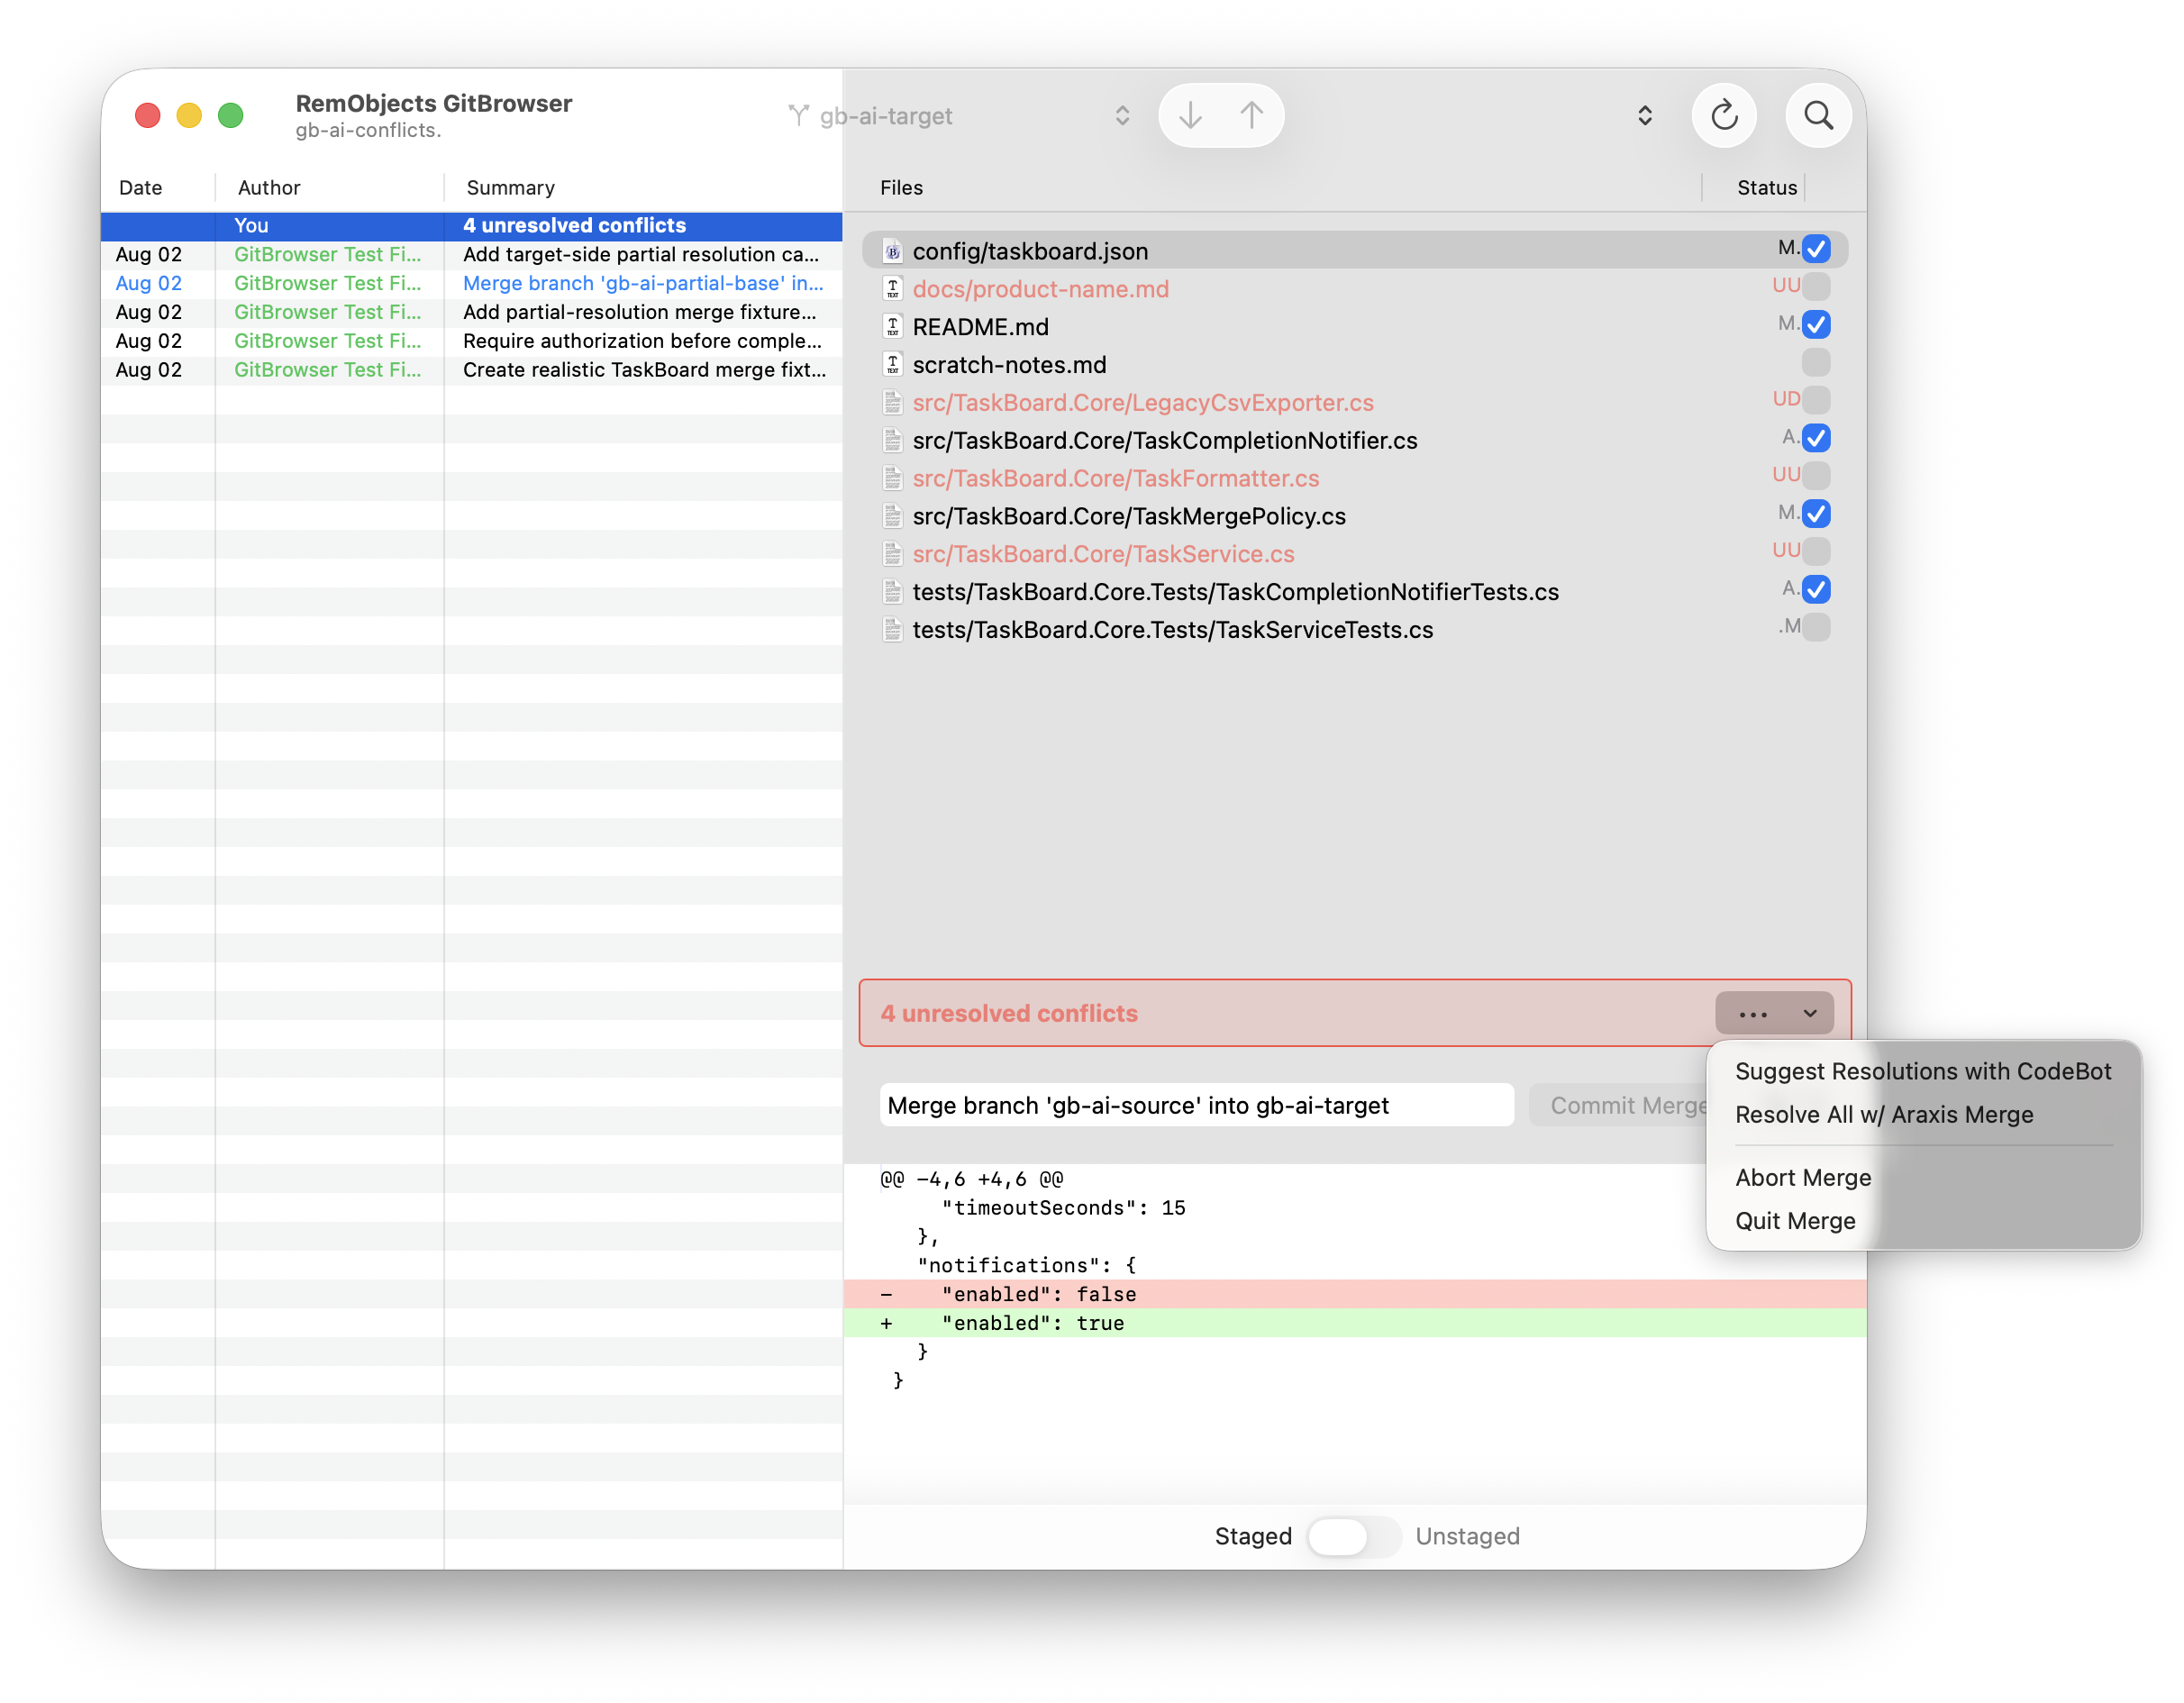
What Conflicts Look Like
When you merge, git is usually smart and can detect and merge changes in files that are in unrelated regions. For example, if you change code in one method of a file while your colleague changed a different one, that will not usually create a conflict, and Git will simply merge the file for you. In an ideal world, that will apply top all files in every merge you ever do, and you will never have to read beyond.
When this fails and Git can not merge changes for you, one or more files will be left in one of these seven statuses, depending on exactly what happened. For most merge conflicts, many files will have merged clean, and only one, two, or a handful remain in conflict.
| Code | Meaning | Typical resolution |
|---|---|---|
UU |
Both modified a file | Combine yours changes with theirs |
AA |
Both added the same file | Choose or combine the two independently added files |
UD |
Deleted by them, changed by you | Keep our modified file or accept their deletion |
DU |
Deleted by you,chnaged by them | Keep their modified file or preserve our deletion |
AU |
Added by you,changed by them | Keep our addition or resolve against their side |
UA |
Added by them, changed by you | Keep their addition or resolve against our side |
DD |
Deleted by both parties | Usually preserve deletion, but restoration remains possible |
The most common conflict types you will see are UU (you both made changes on the same region(s) of files that cannot be merged automatically), followed by UD or DU (one of you made changes to a file the other deleted).
For changes that could not be merged, your local file(s) will (temporarily) contain both versions of the code. This is the part that needs to be resolved to bring yur code back into compiling order.
A merge conflict chunk will look like this, with your change in top and the incoming change below it.
    public string FormatDashboardRow(TaskItem task)
    {
        var status = task.CompletedAtUtc.HasValue ? "completed" : "open";
<<<<<<< HEAD
        var assignee = string.IsNullOrWhiteSpace(task.AssignedTo) ? "unassigned" : task.AssignedTo;
        return $"{task.Title} [{status}] — {assignee}";
=======
        var due = task.DueAtUtc.HasValue ? task.DueAtUtc.Value.ToString("yyyy-MM-dd") : "no due date";
        return $"{task.Title} [{status}] — due {due}";
>>>>>>> the-other-guys-changes
    }
Resolving Conflicts Manually
To resolve a merge manually, you have a few options:
- You can run
git mergetoolfrom the command line, and reslve the merge the old-fashioned way - You can use GitBrowser's built in Conflict Resolution sheet, availab le b y clicking "Resolve Manually" in the "Options" dropdown
- If you have GitBrowser configured to use a diff tool that supports three-way merge, such as Araxis Merge, you can click the "Options" button in the Merge Conflict banner and choose "Resolve w/ ...". This will launch your merge tool of choice for each of the conflicted files in a row and allow you to manually resolve the problem by combining or fixing the affected code.
If you don't want to merge, you can:
- choose "Abort Merge" to let Git try and undo the merge. Ideally, you will be left in the state before you attempted the action that caused the conflict.
- choose "Quit Merge" to exit Merge Conflict mode and leave everything as is. The conflicting files will remain "broken", and you will need to fix and commit them yourself, later.
Normally, you will leave the last two options for extreme cases where you really cannot deal with the merge in conventional ways.
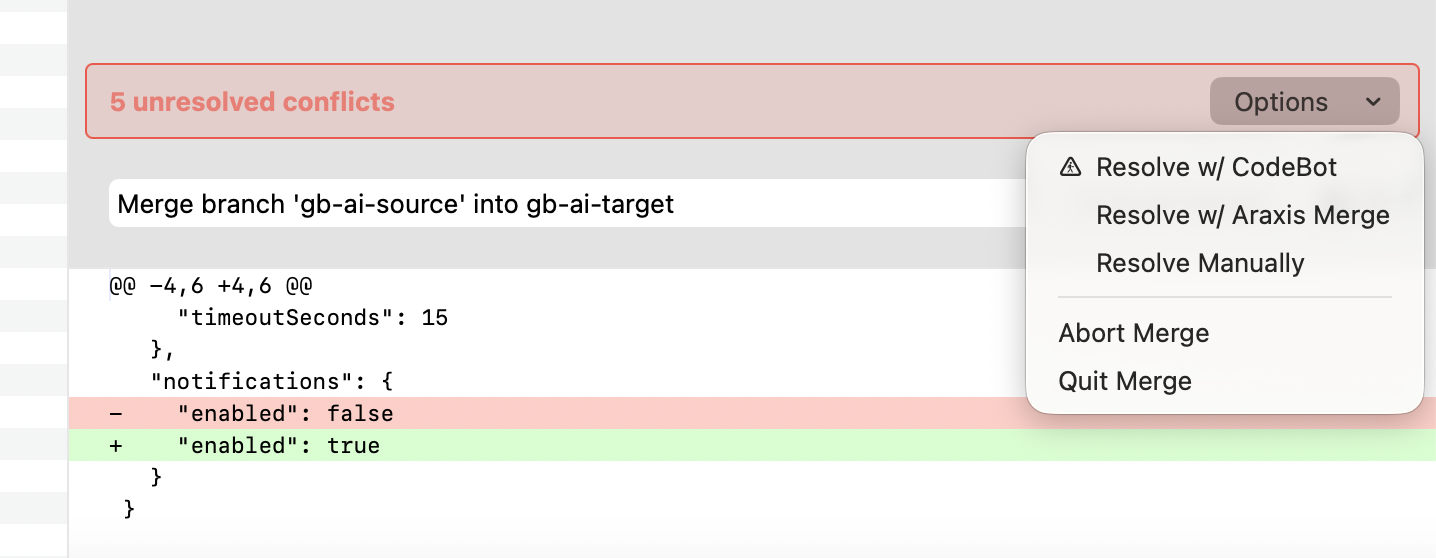
In addition to "Resolve w/ ..." from the banner, you can also invoke "Resolve w/ ..." on individual files, from their context menu.
Use this, when you want to control the order you want to resolve the conflicts in – maybe you know that you want to resolve FileB.pas first, because the way you resolve it will affect your actions for FileA.pas.
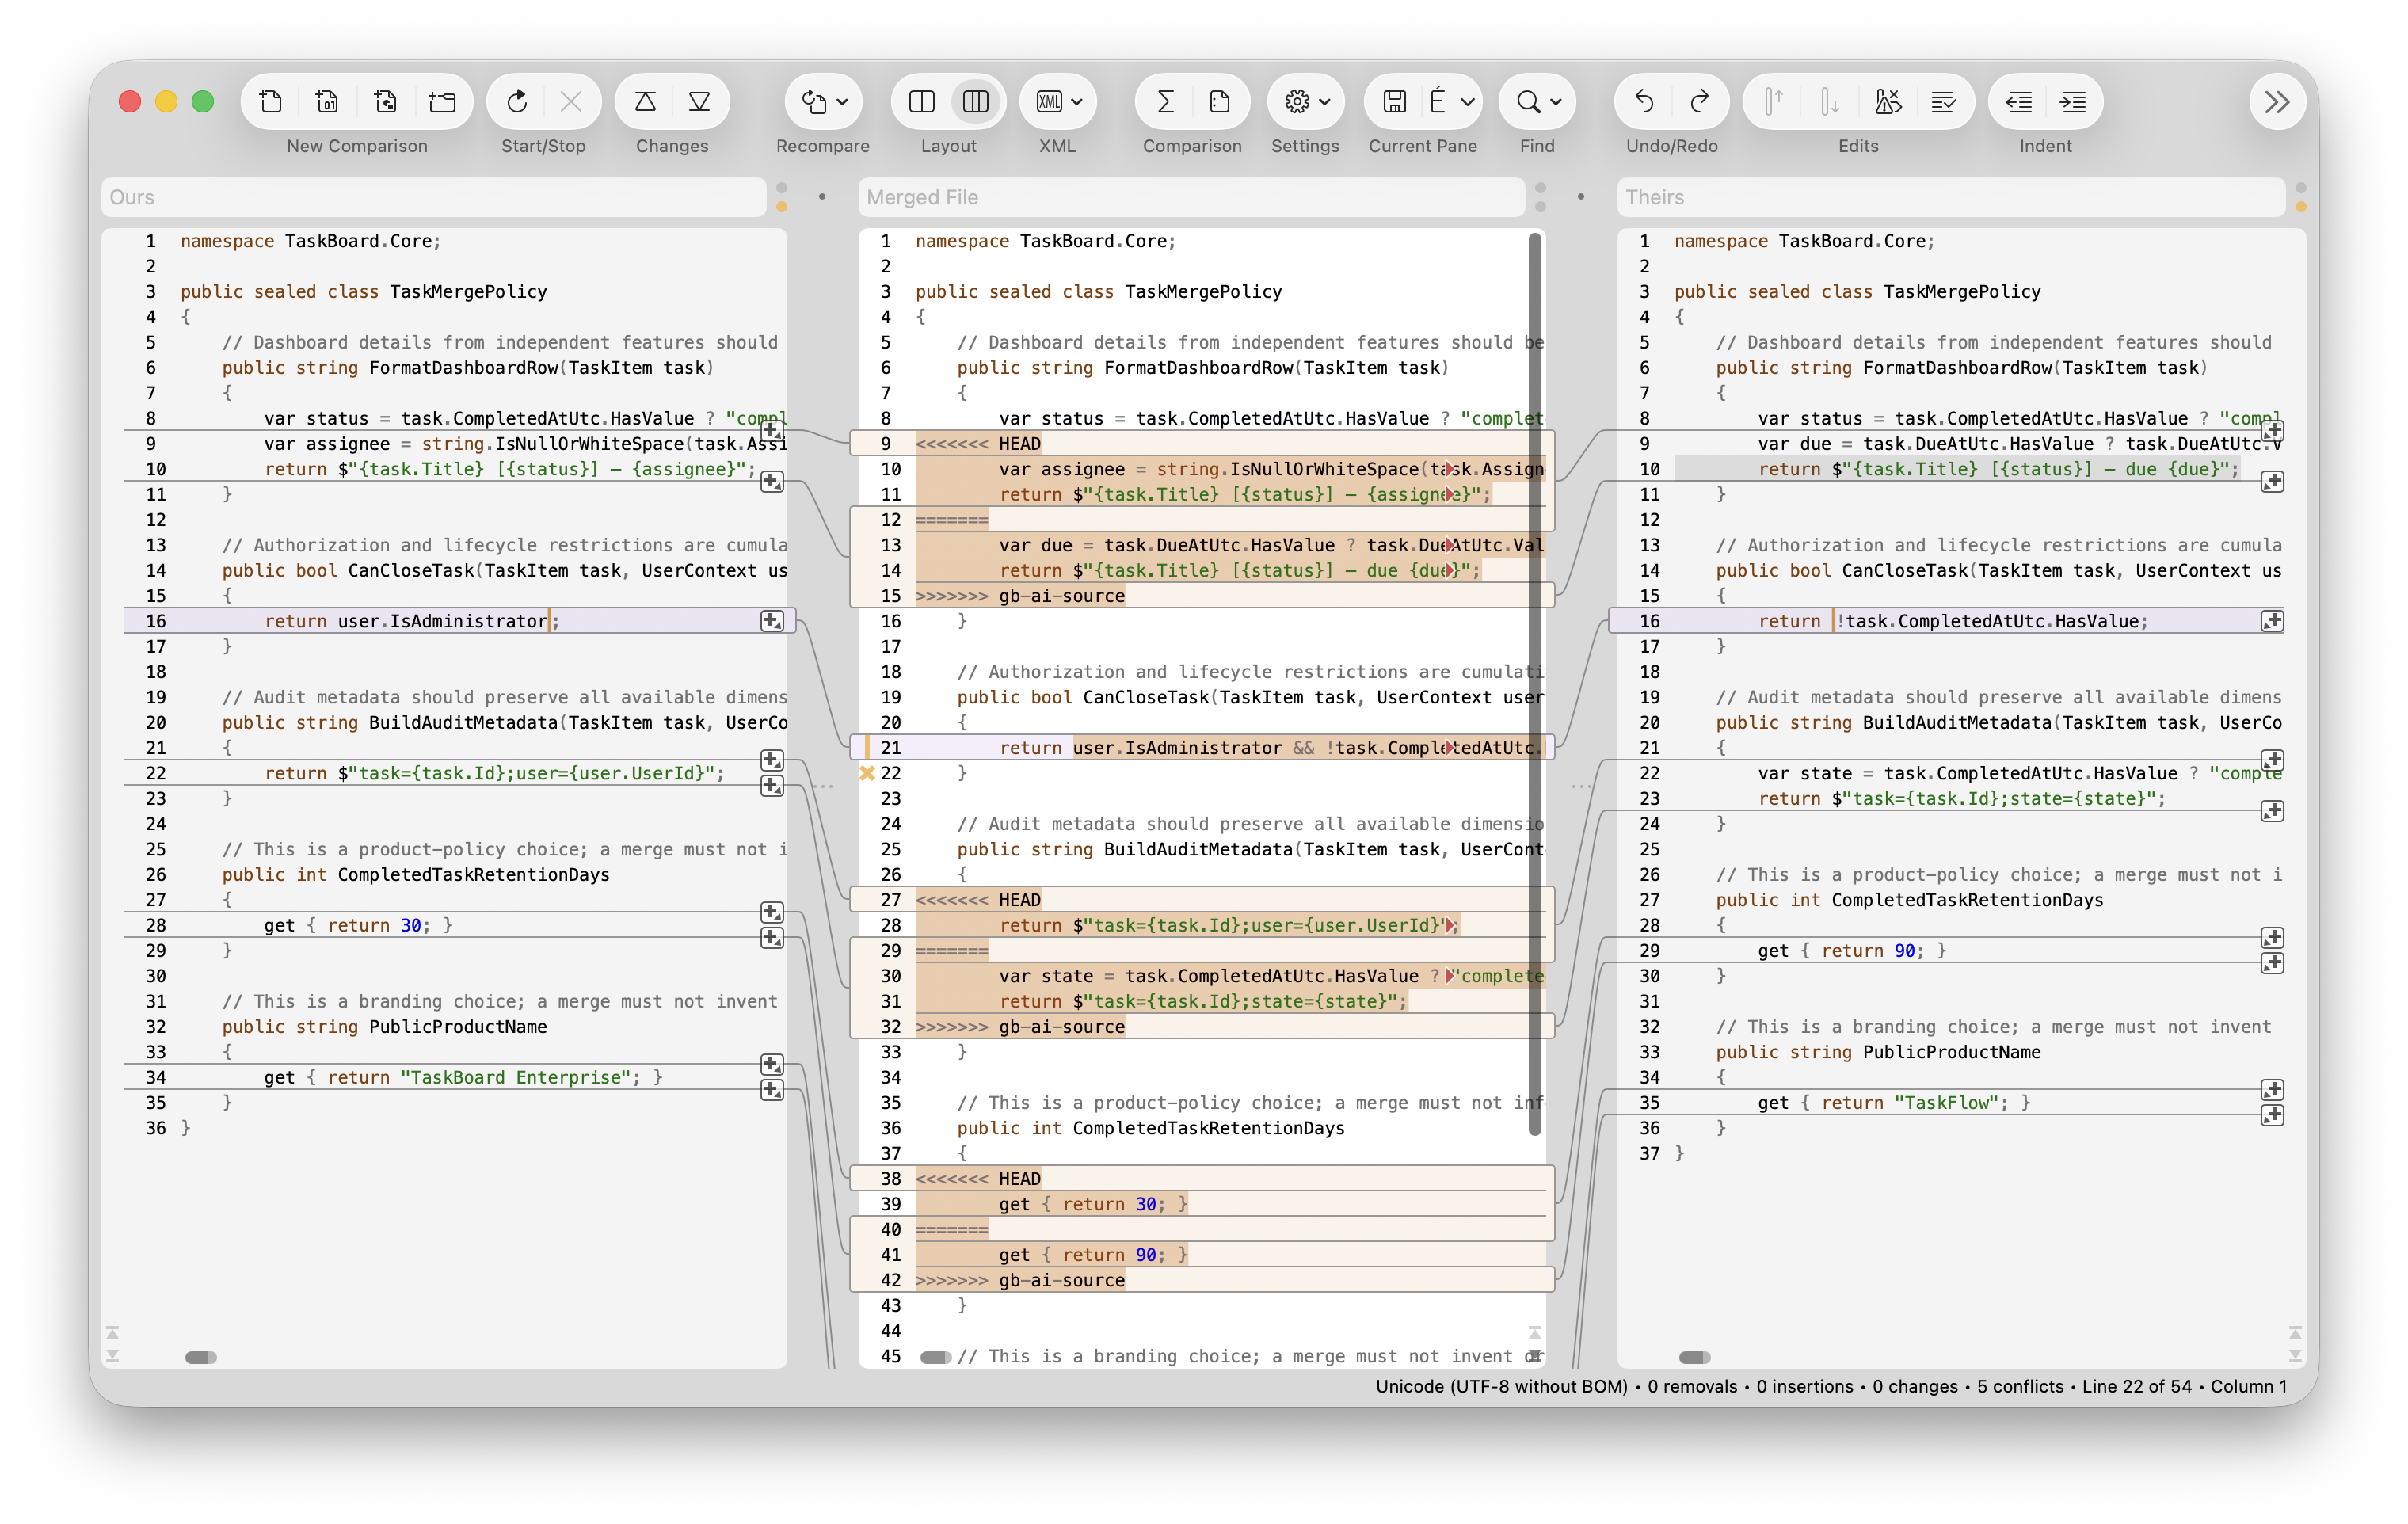
In the screenshot above, a manual resolve is in progress using Araxis Merge. The second conflict block has been addressed by combining the two conditions with &&; the other three remain to be resolved.
Note that when you save and close your merged file from your merge tool with any changes, but GitBrower still detects unresolved conflict markers, it will ask whether to treat the file as resolved or not. Choose "No" if you want to go back and resolve the remainders later; choose Yes if you want to deliberately leave the conflicts in place (or if GitBrowser got it wrong, maybe because the file is supposed to contain <<<<<<< somewhere).
Resolving Conflicts with CodeBot
You can also invite CodeBot to help you solve the merge conflicts by choosing "Resolve with CodeBot", from the conflict banner menu.
CodeBot will look at the details of all conflicted files and have optional access to other files involved in the merge (including those that resolved successfully), for context. Based on this information, it will try to resolve the merge conflicts and show you a summary of its suggestions for you to accept, tweak, or reject:
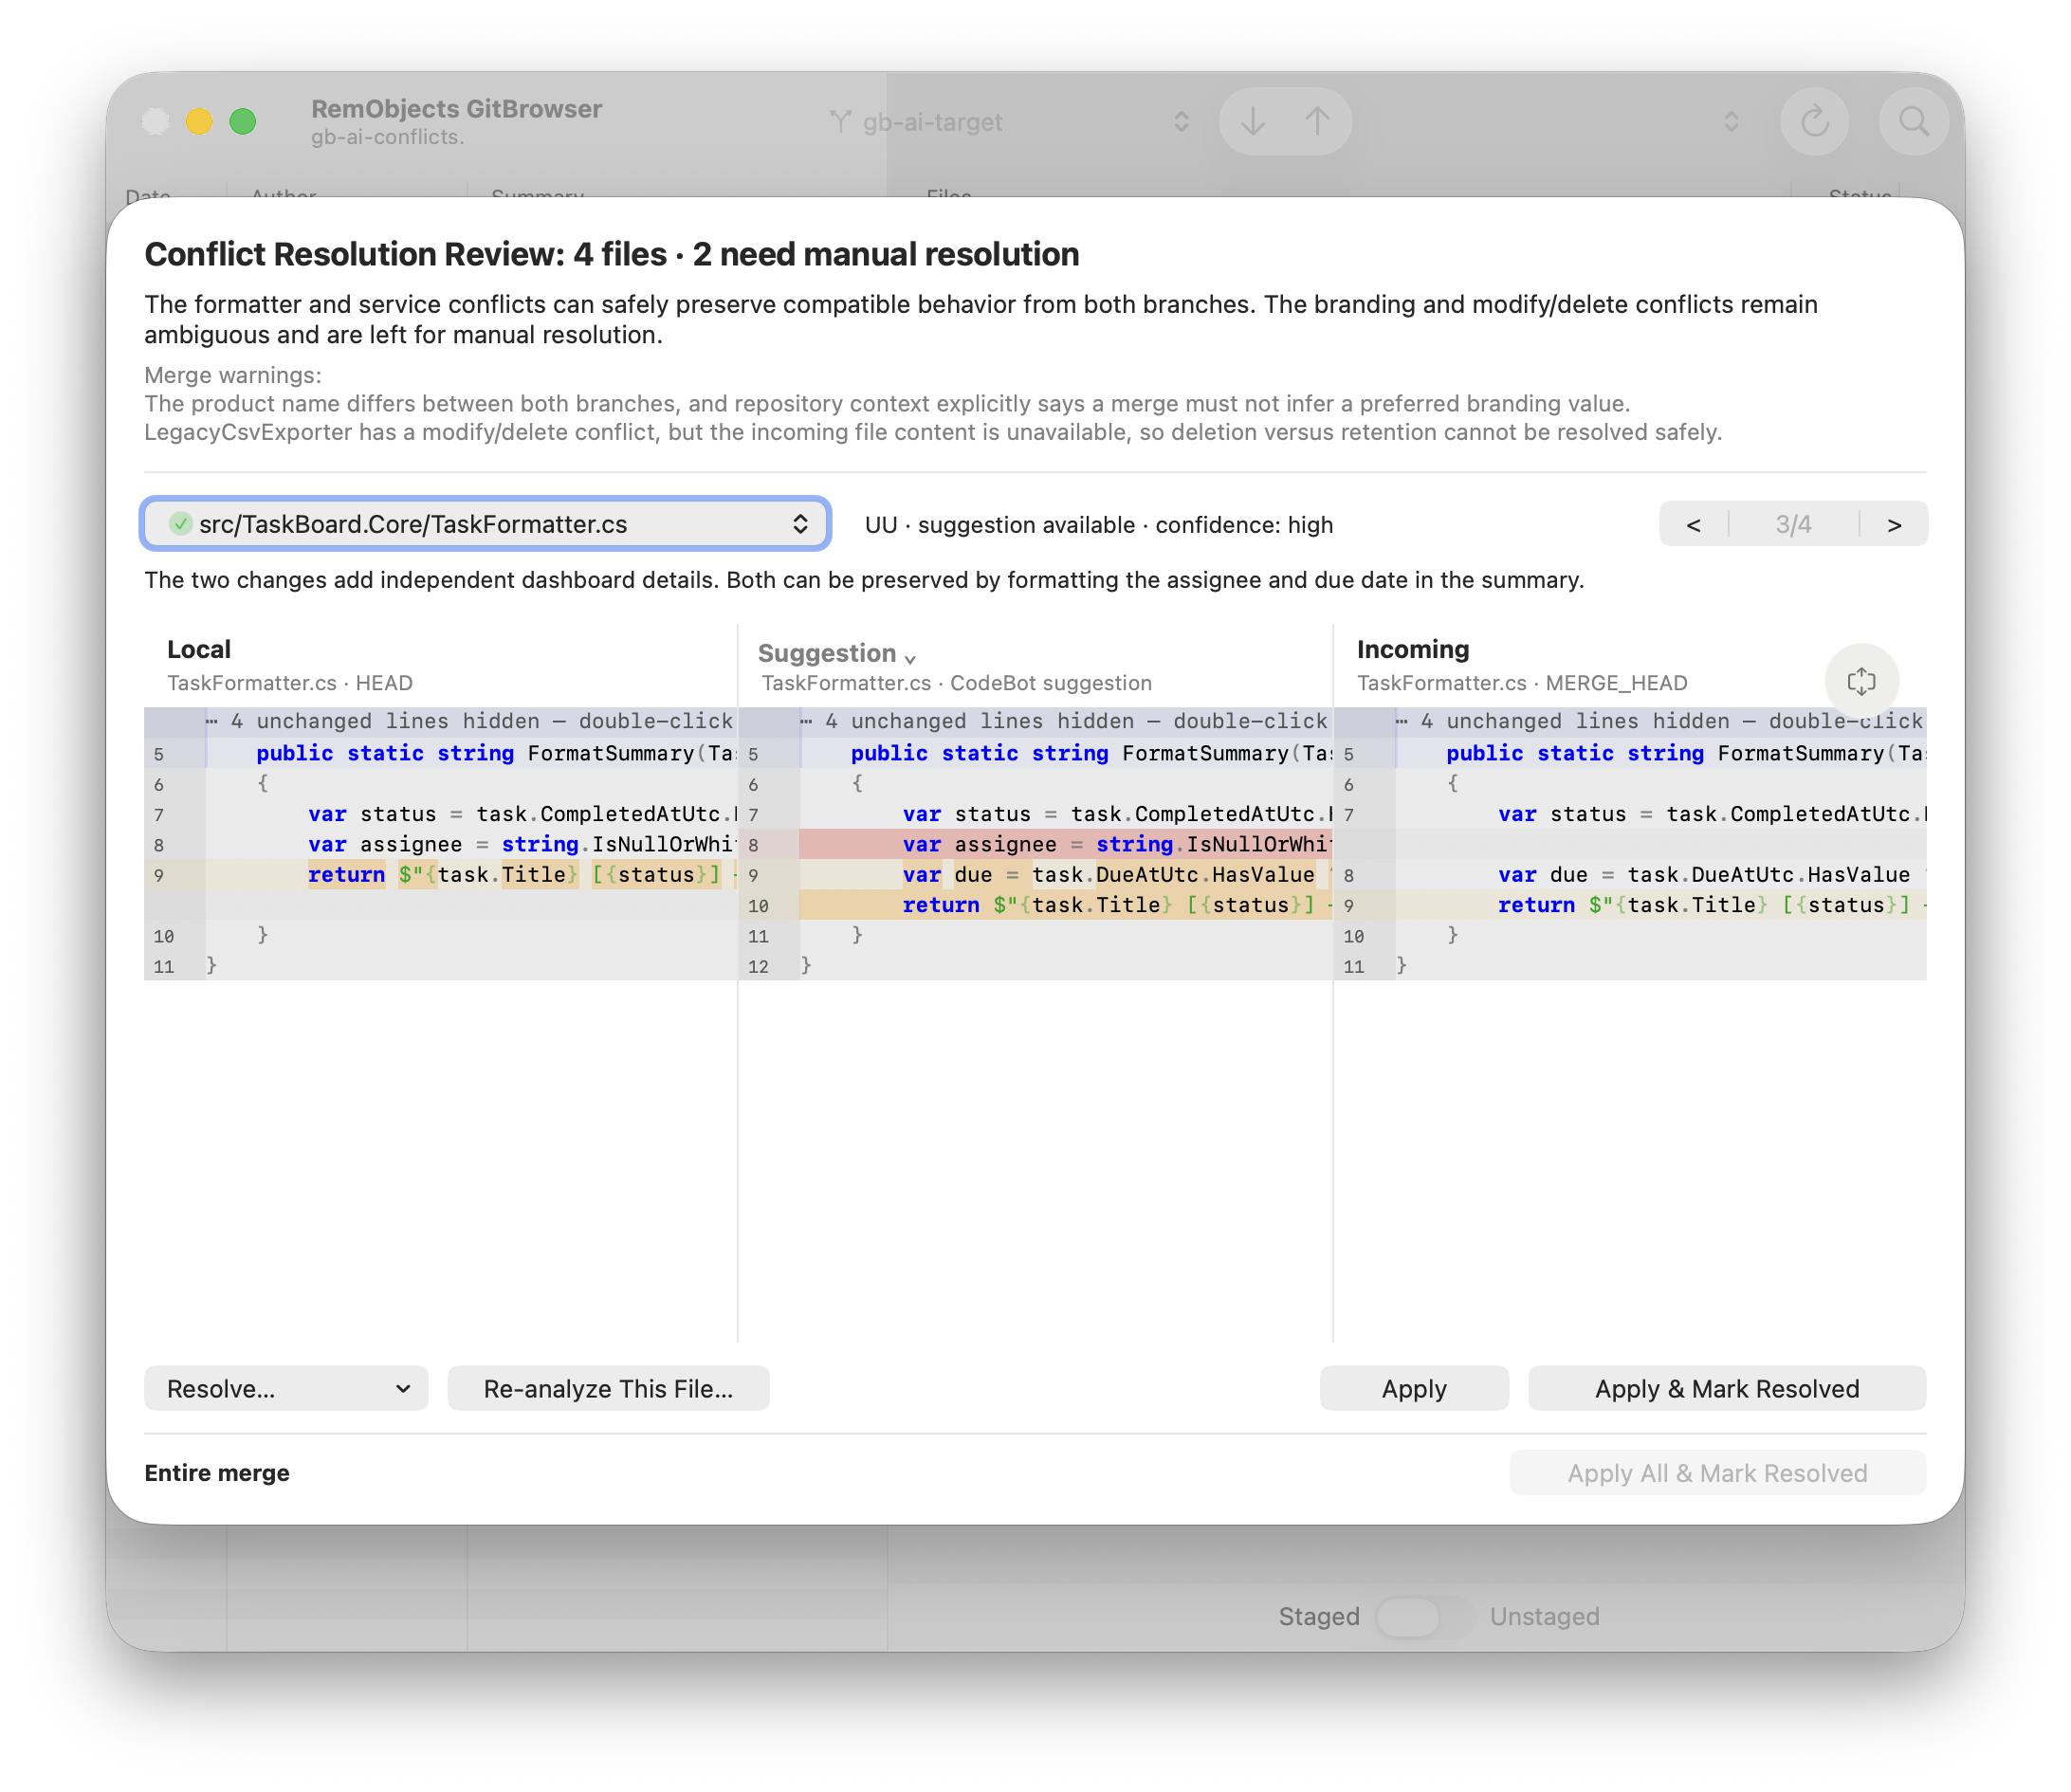
The Conflict Resolution Review sheet starts off with a summary of what CodeBot found, including a description of the problem(s), as well as information on how many of the conflicts ot could resolve.
In an ideal case, CodeBot will be able to solve all conflicts for you, but of course that cannot always happen, since CodeBot doesn't have the full context or thinking behind all changes. Say your colleague changed a timeout value from three minutes to five, while you changed it from the same three minutes to two. There's no right or wrong here for CodeBot to decide for you – you'll have to decide yourself.
Below the summary, the main section of the Conflict Resolution Review sheet lets you review the status of each affected file. Files can fall into three categories:
- Green: CodeBot can fix all conflicts for you
- Yellow: CodeBot can fix some conflicts for you, but some need action
- Red: CodeBot could not help you with this file.
To review the suggestions, you can select each file in turn and see what CodeBot suggests.
You will see a three-way comparison view of the file – your original on the left, the other version on the right, and the merged and/or conflicted version in the center.
For files where CodeBod has made suggested merges, you can toggle the center view between the original conflict and the suggested version for comparison. For partially-suggested files, you will see some unresolved conflicts left in the suggested version that are left for you to fix.
If you want to make tweaks to the merge suggested by CodeBot, or or to fix unresolved conflicts, just edit the code in the center pane to your liking.
Once you are satisfied with changes to a file (whether CodeBot's, your own, or a mixture), you can click "Apply" to save the changes to the file (but keep it marked as unresolved) or click "Apply & Mark Resolved". The first option nos good of yu think your changes are good, but you may want to test or revisit them (e.g. by building the project) before being sure.
ou can also use the "*Apply All... buttons at the bottom of the sheet to do the same for all files in one go. This option only becomes available once no files have any unresolved conflicts left.